My Travels

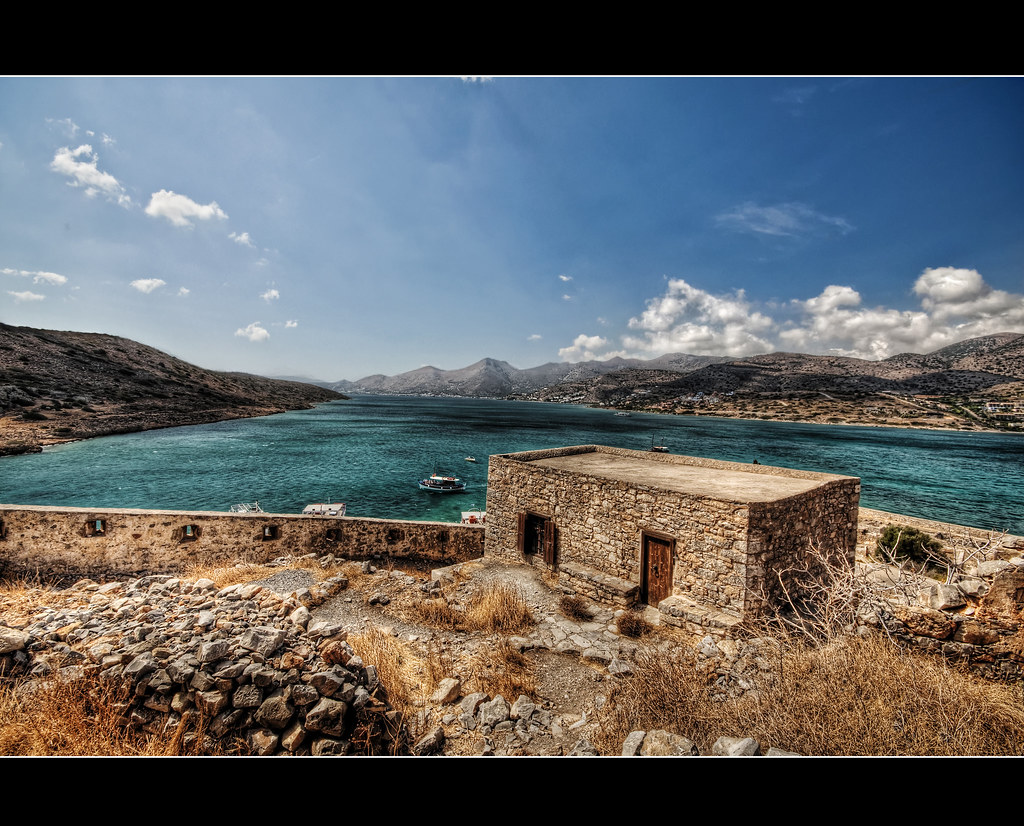
I recently spent a little bit of time exploring Europe. Sadly most of the time I was enjoying myself so much that taking good photographs were the least of my worries, which I now regret!

Looking back I also wish I had taken a DSLR despite the size. I had bought a Panasonic Lumix Tz-6 as a point and shoot substitute and it wasn't half bad. I am finally getting round to posting a few of the pics I took while abroad!

This particular photo is a view of the Louvre in Paris. I liked the effect on the people in the foreground and their colouration through PP even though it did mess up and smudge some of the edges of the archway. I felt it was a worthy sacrifice though that I may fix at some point (when I learn how).
Louvre-1020651

'High Dynamic Range' Photography

Hi there,

Hope all you regular readers (me and jim) are enjoying the new look of the blog, it will be evolving over time this is just the very very basic look of it just now while we sorted out the sizing to make images look a lot nicer!

Anyway back to my post! Ever since happening upon a photo blog that goes by the name Stuck in Customs I have been fixated on HDR photography. I have tried it before but without much success! It was just luck if it came out decent after running it though the HDR software. But after heading over to Stuck in Customs and checking out Trey's excellent tutorial he has written I have increased the odds of getting a keeper!

Basically the process is you take 3 photos (my D90 only supports 3) that are all exposed differently. It usually goes like this... under exposed 1-stop ---> correct exposure ----> over exposed 1-stop.

This can be changed to +-2 stops depending on the contrast of the light.

These are then merged together in special HDR software and after playing with some sliders and merging and masking in photoshop (read the Stuck in Customs Tutorial) you have the finished product!

Here is one of my attemps! Click the title of this post to check out some more!

Elounda2009-1-2


Self Portrait Challenge

me

I challenged Craig to come up with a self portrait and that I would do the same. It seemed like a good idea to challenge each other as we have never really done self portraits, especially not ones we'd consider showcasing on the blog!

Sadly Craig so far has not produced a single result! I am hoping that he is just working so hard that the final photo will be amazing - watch this space!!

Anyway, here is my attempt!


Sooooo..

So I havn't posted in a while due to not having much time to get out there and shoot some pictures to talk about and also Jim is travelling Europe for a month so has been slacking with the posts which isn't acceptable!

Anyway... Just an update on some of the equipment I am starting to get. I am focussing on lighting at the moment so I have invested in a new flash gun, the Nikon SB-900 to accompany my SB-600. It's a really great flash and nikons flagship mode with a better screen and menu as well as more power and zoom range to throw the light further.

I also got my 1st lighting kit which consists of a light stand, hotshoe adapter, umbrella adapter and an 80cm all in one umbrella. I am really looking forward to testing this out. Just need to find someone to model for me! I'm sure Jim will when he gets back. As long as everyone is comfortable witll full frontal male nudity. joke


-- Craig

Wacom Bamboo A6 Tablet

I can't help but get the feeling that every time that I post it is about a new piece of gear that I buy!

This time its not camera related but it is relevant to the post processing section of the blog. Its the Wacom Bamboo A6 graphic tablet.

I decided to buy this after I got a bit tired of struggling to do fine details with the brush in Lightroom and also the lasso tool in Photoshop. It is a very nice piece of kit and it serves its purpose very well! Using the brush and lasso tool among others work much better and more accurately. The tablet itself is small but not to small to limit the accuracy of the pen placement. It has customizable buttons and a touch sensitive scroll wheel (like an ipod) This comes in extremely useful in Lightroom/Photoshop because it can be used to zoom in and out without having to touch the mouse or keyboard.

It cost £55 from EBuyer and my conclusion is that it was worth every penny!

I have uploaded a little unboxing vid so you can see the dimensions etc of the tablet.

(Soz it doesnt really fit in the box you may need to click it to watch it full)


Photoshop Rounded Photo Edges

Rounding the edges of your photos in photoshop, the quick and easy way!

This can be done  in most versions of Photoshop (as far as I am aware), and I tried it in Elements and CS4. I found a few different guides but I though
t they were slighlty over complicated. I am not going to use any photoshop jargon, just what buttons to press and when! I'll break it down into simple steps:

Step 1:
Select the rounded rectangle tool from the shapes option in the tool bar as seen in the picture.Change the radius of the rounded rectangle to about 125, this is done in the bar above your photo. Then select the area of the photo you wish to keep with the rounded edges. It will be a big black blob at the moment but that's what we want!


Step 2:
You need to unlock the background layer in the layers palette, right click on the first player which will be called background layer and click duplicate layer. Call it what ever you would like but now it will be unlocked and free to be moved. Do this by dragging it above the big black blob layer.

Step3:
I won't bother to explain what this process is as this is meant to be a quick and easy guide. So for this step simply click on the background layer in the layer paletee and press Control and G. Now press Control, Shift and E to combine all the layers! and there you have it, nice rounded edges!

Step4:
The photo you have just rounded will automatically have a white background, which means if you try to put your picture onto a website with a black b
ackground for example, the corners you have rounded with be white where the square edges used to be. Therefore if you want to post your photo onto  a black background, simply use the bucket fill tool to fill in the background with black, or any other colour you desire. This will mask the areas the rounded tool has cut away.

I hope this tutorial hasn't been too longwinded! Below are some examples of what your photos will look like, however these are using the black background.
 - James

Free photo software

I enjoy making photos into more fun and interesting things, just as turning a standard photo into a polaroid. I have had a look around the net for some good free and quick piecies of software to enhance your photos without the need to follow a detailed photoshop tutorial!

The first Program is called Polaroid, a small and extremely simple piece of software designed to turn your picture into a convincing polaroid! Not only does it mess with the colours it also adds smudge marks and lines to make your picture look like it has actually been handled.


I then simply found a decent looking handwriting font and bob's your uncle, perfect polaroids everytime!

The second piece of software I would like to recommend is Tiltshift. Where Tiltshift lenses can be expensive, this free site allows you to upload any picture and it will convert it to give it the miniature model look. My example is not that good as I did not really have any photos suitable enough, but check out Hammerhead's picture from Flickr for a really good example. Below is my example:


- James

Tamron 90mm 2.8 Macro

Me again!

Just a quick post to let you all know that I have treated myself to a new lens for my kit. I've never done any macro photography and I wanted to get into it so I had a look around at what are the best options out there and came to the conclusion that the Tamron 90mm offers excellent image quality and build for a very reasonable price. 

Here are some pics of the lens itself:


So far my impressions of the lens are very positive! Super sharp images and obviously excellent macro capabilities. Being a 1st time shooter of macro photography im finding it challenging as the Depth of Field is so thin at 1:1 magnification that if you are shooting handheld even the slightest body movement can throw it out of focus. But get it right and you nail some fantastic shots! Heres 2 that I took today out in the garden. Hopefully I will be posting alot more Macro shots as I take them. Highly Recommended Lens.


-- Craig


Lumix Panorama Assist

The Panasonic Lumix TZ6 and other Panasonic models come with a feature called Panorama Assist. Instead of taking a group of photos and stitching then together as soon as their taken, the Assist feature means that it does not do this for you, and it has to be stitched together later in PP.

The feature allows you to take a photo, and bring up an overlap of that photo on the next picture you are taking of the panorama. It takes a while to get the hang of, and if your photographing a landscape with no landmarks it is hard to allign the overlaps. However, the point of this post was to admit that I was impressed with the feature, and when using a decent overlapping program, such as Photoshop's Photomerge, the results are pretty good!

Below is an example of a landscape put together with 3 photos. Even when reviewing the photos it is hard to tell if you have matched them up correctly, but it seems to have worked pretty well.

 - James


Gritty Portrait Technique

Hi there,

This is my 1st post of the blog so I thought I would kick things off with a nice PP technique that I discovered in the Lightroom 2 book by Scott Kelby. This technique doesn't work well on all photos choose wisely. It tends to work best on portraits that are dark and have a lot of mood. But I have had success on photos that aren't. Just test it out!

Right here are the steps..

1. Enter the Develop module of Lightroom 2 and crank all these sliders up to +100.
Recovery, Fill Light, Contrast, Clarity and Vibrance. Now things look a little funky and not very good to be honest. But don't worry there is more to it than that.

2. Now lets get those over vibrant colours down a bit but keep the nice vibrant high lights. Do this by grabbing the Saturation slider and bringing it down to a level that looks nice to your eye.

3. Finish up by adding a nice Vignette effect to your picture. Do this by going to the Vignettes panel and adjust the lens correction amount and midpoint to a place that looks good.

Done! Hopefully your satisfied with the effect, I really like how it turns a somewhat boring portrait into one with a gritty vibrant look that belongs in a magazine!

To the left is a sample of the settings I used on one of the sample pics below.


- Craig

Presets


I've always been a fan of black and white photos, and there is more than one way to achieve a good b&w effect in Lightroom. However I stumbled upon some presets I found at Inside Lightroom, these ones being specifically for different tones and "old" effects.

The above was using the High Contrast 2 filter, and below using the Mexico Road filter. Obviously it is not the best photo to apply the "old" style filter too but it gives a good idea of the end result.
These filters can obviously be achieved easily on your own within Lightroom, but they were incredibley easy to download and use I feel have pretty decent results.

- James

The First Post!


Oast Houses
 Originally uploaded by interstella87
Thought I'd start off this new blog with a quick hello! Hopefully we can update this blog as often as we can with any new stuff!

I'd like to link my flickr site which can be found at Jim's Flickr in the right hand menu. Havent had the account for long but take a look at my photos if your interested, it may give an idea of not only my lack of skill but also how the Panasonic Lumix TZ6 actually performs!

I spent most of today out on my bike getting to grips with the TZ6, and I have to say it performed better than expected, check my flickr for some photos from today.

Over on the right is probably my favourite shot from the day, The Oast Houses.I darkened it and adjusted the vibrancy and saturation in Lightroom 2 which helped bring out the sky.

- James